
September is here and that means it's time to get organized and ready to teach. Sometimes it can seem overwhelming because there is so much to do. In this blog post, I'd like to share with you four awesome organization ideas that can help you prepare for the fall. I've also included some free downloadable files.
#1 Using an iPad (or other device) for Scheduling

There are so many different devices available with built-in calendars. If you haven’t done so already, now may be the time to embrace some of that new technology. I can only comment on Apple products because that’s what I have been using. My iPad has really changed the way that I organize my teaching schedule. The calendar works so much better than my previous hand-written sheets. Here are some of the advantages of this amazing tool.
- You can set up your teaching schedule for the fall (lesson times and students). Once you have entered a student in the first week, you can have that event repeat throughout the year. Just make sure you go through the calendar and delete the lessons from the holiday weeks!
- You can colour-code the entries. I use different colours for regular lessons, missed lessons, part-time lessons etc. (You'll have to delete that week's repeating entry and re-enter it if you want to change colour). As with any app, there's always a learning curve as you try to adapt the program for your own needs. But I can tell you from experience, it's well worth the effort!
- At the beginning of each lesson, you can set an alarm to sound when the lesson is finished (with a 5-minute warning). This really helps you to stay on time.
- You can add comments to specific lessons using the notes at the bottom of each event (i.e. reasons for missed or changed lessons)
- Lessons can easily be moved around making re-scheduling a breeze.
- The search function is fantastic. In an instant, you can see all the lessons for one student for the entire year.
- The entire calendar is backed up in the cloud, so you won’t lose any information.
- The calendar on the iPad syncs through the cloud with any of your other Apple devices.

#2 Studio Events Calendar
Another great tool is my one-page Yearly Studio Calendar. You can use the same chart each year. Just change the dates and add all the important information that your students and parents need to know for the whole year (i.e. master classes, recitals, festivals, holidays, deadlines, exams, upcoming events, vacations, etc).
This Calendar can be e-mailed to your parents. I place a copy of the Calendar on the bulletin board in my waiting room. I also tape a copy in the back of each student’s Organizer so that we can refer to it at their lesson throughout the year.
This year, I have 3 PDF fillable versions of the Yearly Studio Calendar to share. All you have to do is download the file you want and then add the information for your own teaching year.
File #1 - Studio Calendar with all RCM (Royal Conservatory of Music) dates and Canadian holidays.
File #2 - Studio Calendar with Canadian holidays only (for teachers who do not use the RCM system).
File #3 - Studio Calendar with US holidays only.
 Note - PDF Fillable files that are sent by e-mail need to be opened with a program that reads the filled-in information such as Adobe Reader. Some e-mail programs will not show the filled-in information, however the information is still there.
#3 Yearly Student Performance Tracking Chart
I would also like to share my very handy ‘Student Performance Tracking Chart’ (Excel file) for organizing student performances throughout the year. You can add the student’s names plus all the dates for master classes, recitals and other performances. Then print this file and put it on a clipboard in your studio. This chart can then be used for performance planning throughout the year for your entire class.
You can add pieces (in pencil) to the chart as they are chosen throughout the teaching week. I find that it’s faster in the lesson to work with a paper copy. Every 2 weeks or so, you can update the chart on the computer and print it again. That way, you'll know exactly what is being worked on for performances at all times. There's a special column in the chart for keeping track of total playing time for some of the pieces. This is useful when it comes to timing recitals, competitions or master classes.
Here's the original file for my Student Performance Tracking Chart. You can download it and then add the names, dates and events from your own studio. I've also included 11 other worksheets for master class and recital program planning (see tabs at the bottom of the downloaded excel sheet).

#4 The Student Music Organizer - The Complete Dictation Book
Here are some of the benefits of using the The Student Music Organizer:
- Saves time in a lesson. The book is so easy to use….all you have to do is fill it in and it’s designed to last for the entire year.
- 8 1/2 x 11” format - there's lots of room for writing on each lesson page. Manuscript is also included at the bottom of each page.
- Some sections included: Goal Setting, Favourite Pieces, Exam and Practice Planning.
- Lots of History Reference Material: Composer Chart, Summary Sheets for Musical Time Periods (Baroque, Classical etc).
- Also includes Music Dictionaries (with terms grouped according to style, speed, touch, etc), Basic Music Theory Reference Guides and a very handy Comparative Fingering Chart for keyboard scales.
Organization is the key to having a well-run studio. My students and parents especially appreciate it when they know exactly what is happening throughout the year. With a little planning ahead of time, you can sail into the fall knowing that everything is ready to go.
♥︎ Remember - Great Music Comes From the Heart ♥︎


Piano Photo by Miki Yoshihito
Fall Photo by Darlene Irwin
 Starting a new piece with a student can sometimes be a daunting challenge. It should be something that appeals to your student and helps them progress musically towards their goals. It should also contain sound pedagogical ideas. Some questions that you need to ask yourself are….what time period do you want your student to explore? Do they need a certain type of piece for an upcoming exam? Does the piece help them to reach their goals? Can your student handle the technical challenges within the piece? And most importantly…..do they like it!!
OK….so you and your student have picked the perfect piece. Now what? How do you make this piece fun, attainable, and approachable? In this blog post, I’d like to share with you some of the ideas that have worked for my students.
Introducing….Colours, Sections, and Arrows!

Colouring the Music
-
After we have chosen a new piece, the first thing we do is colour all the markings on the score. (I know…some teachers may not be comfortable colouring the score. I find that my students really enjoy doing this. They tell me that the piece doesn’t look ‘worked on’ if it’s not coloured!)
- I have a code that we use…Forte is pink, piano is yellow etc. We colour all the other markings green…tenutos, accents, Italian terms & signs. My theory is that when they see certain colours, they will associate that colour with the dynamics marked in the music. We talk about each marking as we colour it. Accents, including tenutos, tend to hide on the page. They are much easier to see when they are coloured green (see previous blog post for details). We also discuss key signature, time signature, articulation, phrasing and any terms or signs.
-
Colouring has worked for students of all ages. A fugue is MUCH easier to learn when the voices are shown in different colours. (This could be done on a copy rather than on the original score).
- Over the years, my students have done many exams, recitals, evaluations, festival classes and auditions. It's important to note that adjudicators and examiners have never had a problem with or even mentioned the fact that my students were using music that was coloured.

Sections
-
Break the piece down into logical, manageable sections, according to phrasing, structure and motifs. I do this by drawing a pencil line at the end of each section. The sections are then labeled A, B, C etc. If a long song has more than 26 sections, we have actually resorted to using double letters! (AA,BB etc.)
-
Make sure that repeated sections are divided the same way i.e. in the recapitulation of a Sonata or Sonatina.
-
As you are marking the sections, you can discuss a little of the history, style and form of the piece. You can also make note of any key modulations and mark the main cadence points.
-
When teaching a new song, I like to have them start by playing the left hand first. We compare the sections and look for patterns. Check and see if the patterns are repeating. Do they change key? Do the intervals change? Are there any sequence or imitation sections? Are there any variations in the patterns?
- Have your student start by learning 1 or 2 sections, hands separately and then hands together. You can add more sections as they progress week by week. That way, if there are mistakes, they can be fixed quickly. This saves time because they learn it properly the first time.
- Having a piece divided into sections is also essential for memorization. It provides safely nets all the way through the piece - places where your student can jump if they have a lapse in memory.
- Boxes are small parts within a larger section. They can be labeled Box#1, Box#2 etc. These are very tricky passages within a larger section that need special attention.
- Have your students practice the boxes hands separately, then hands together at a slow tempo, until it is fluent and played correctly. A box can also be subdivided into mini-boxes!

Arrows
-
Arrows are great for correcting learned mistakes. I use the coloured Post-it Flags (Mini Arrows). They can be placed on the music to point to specific problems, you can write on them and they can be removed once the mistake is corrected. They are also reusable!
-
As I’m listening to a piece in a lesson, I can quickly mark mistakes with these arrows. I can then go back at the end of the performance and explain why the arrows are there.
-
The next time I hear the piece, I can removed arrows from issues that are fixed or move them if there are other problems. The really cool part is that I can place the arrows as the student plays the piece. It's quick and easy. This helps me to remember what I have heard and what I want them to fix. It also saves me from having to write a lot of notes!
-
You could take the arrows a step farther and colour code them for certain problems i.e. blue for wrong notes, yellow for missing dynamics, red for phrasing issues, pink for missed rests etc.
-
Sometimes my student's pieces are COVERED with arrows! When the problems are fixed, the arrows are removed. My students love trying to get rid of all the arrows on their music!
-
We do remove all arrows just before a performance such as an exam or audition.
Here are a couple of examples of how I would use these techniques. These pieces are coloured and divided into sections. The problem areas have been boxed. I have used red arrows to show phrasing concerns, yellow arrows for problems with dynamics and green arrows for other problems.
Gavotte in D Major

Sonatina in G Major


As a teacher, I always strive to make the music learning process as fun as possible. My student love to colour their music. The sections and boxes make it so much easier to learn and memorize a piece AND they have safety spots throughout their song. The arrows let them know exactly what needs to be fixed. Have fun exploring these ideas with your students.
♥︎ Remember - Great Music Comes From the Heart ♥︎


Summer is a great time to relax and enjoy the nice weather. But for music teachers, summer is also the time to prepare for the fall. There is always so much to do before regular lessons resume. Organization is the key to having a well-run business. With a little planning ahead of time, you can sail into September knowing that everything is ready to go! That way you will spend less time worrying about all the things that you have to do and more time enjoying the time off. I would like to share with you a few great organizational ideas that have worked for me.
-
One of the first things that I do when preparing for the upcoming season is to work on my Yearly Studio Calendar. I have an Excel chart that I use to generate a one-page Calendar for parents and students. I can use the same chart each year. I just change the dates and add all the important information that I feel my students and parents need to know for the whole year (i.e. master classes, recitals, festivals, holidays, deadlines, exams, upcoming events, vacations, etc). In late August, I e-mail this to all of my parents along with a reminder of their first lesson date and time. I place a copy of the Calendar on the bulletin board in my waiting room. I also tape a copy in the back of each student’s Organizer so that I can refer to it at their lesson throughout the year and highlight any upcoming dates. I've included a link to my original file for the Yearly Studio Calendar in this post. That way, you can download it and change the information to suit your own teaching year.

- The iPad is an amazing tool. For me, it was definitely worth the investment. (See previous Blog Post called 'The iPad and the Music Teacher'). The Calendar App is one of the best studio organization tools on the iPad. I love how it backs up automatically to the cloud so that I don’t have to worry about losing my information. Entries can be colour coded to keep track of lessons that have been changed or missed. You can also write notes pertaining to a lesson directly on the individual entires. The search function is fantastic. In an instant, I can see all of the lessons for one particular student for the entire year. I also find the Contacts App very useful for keeping track of all student information. My iPad has revolutionized the way that I organize my business. Here's a link to help you get started. This article will help you with the basics of using the calendar App.
- I have a very handy ‘Performance Tracking Chart’ (Excel File) that I use to organize all student performances throughout the year. Once I’ve completed my yearly calendar, I set up this chart with student's names and dates of all master classes, recitals and other performances. Then I print it and put it on a clip board that I keep beside me in the studio. I can use this chart for performance planning throughout the year. In September, the first thing we do is pick a Master Class piece (for the end of October) and a Christmas recital piece. I will also use this to help plan performances for exam preparation. I can keep track of all performance pieces for all students throughout the year on these sheets. I find it easier to work with a paper copy in the studio. I can fill it in as I’m teaching. Every two weeks or so, I will update the chart on the computer with any changes or additions and print it again. This gives me a running list of all performance pieces being worked on by my students at all times. I also list the students' pieces in their own Organizer. There is a column in the chart for keeping track of the total playing time for pieces which is useful for timing recitals and Master Classes. Here is the original file of my ‘Performance Tracking Chart’. This will allow you to input the names, dates and events to suit your own studio.

-
The Student Music Organizer is another great time-saving teaching tool. Each September, my students start a brand new book. The book is written on 8 1/2 x 11” paper so there is lots of room for writing notes. It is is designed to last for an entire year of lessons so you don't have to buy 2 or 3 smaller notebooks. At the end of the year, you will have a complete record of what has been done for the entire year. Parents love it as well. If they have a question, I can tell them to check the Organizer! Here are some of the sections included in this great resource:
-
Goal Setting Section — I do this on the first lesson so that we know how to plan for the year.
-
Favourite Piece Section — This is very helpful when planning recitals, festivals or exams.
-
Exam Planning — for students doing an exam in the upcoming year, we start planning right away.
-
Practice Planning — after we have set goals for the year, we then decide together how much time they will need to practice each week to attain these goals. This time can then be broken down into smaller sections so they know how long to spend on each aspect i.e. pieces, technique, sight reading
-
The Organizer contains 35 Assignment Pages. These sheets can be filled out during the lesson. Each page contains a chart for recording weekly practice. There is also manuscript across the bottom and the pages are numbered so you can refer back to a scale or exercise assigned earlier in the year.
-
The back of the book contains lots and lots of valuable reference material. You will find extra manuscript paper, a composer chart, summary sheets for musical time periods (Baroque, Classical, Romantic, Impressionism and Modern), music dictionaries, basic music theory reference guides and a wonderful comparative fingering chart for keyboard instruments.

- ♫ A SPECIAL NOTE ♫…The Student Music Organizer Website is having a fantastic 15/15 sale! For the entire month of August, teachers will receive 15% off of their entire order if they order 15 organizers or more. Use the discount code AUGUST at checkout to take advantage of this terrific deal.
Have a great rest-of-the summer AND have fun getting organized for September.
♥︎ Remember, Great Music Comes from the Heart ♥︎

♥︎ Remember - Great Music Comes From the Heart ♥︎

Photo credit: "Over the River and Through the Woods" by garlandcannon

All Cows Eat Grass.....this is one of the many popular sentences used to teach note reading on the grand staff. But is this the most effective way for students to become the best sight readers?
Sight-reading is a key. It can open the door to the amazing world of music. To be a good sight reader, a student must first learn how to read the notes. It is important to remember that music is a language. When a child is first learning to read a language, they have to start by learning the alphabet. Then they learn how to read words, sentences and eventually books, using those letters. It is the same for music and it takes a good deal of time and effort.
Sight-reading is a gift. I often tell my students that sight reading is probably one of the greatest gifts that I can give to them. My hope for my students is that they will continue to play the piano long after they have finished taking lessons. Many times I have heard adults regretfully admit that they took lessons when they were young but can no longer play.
Sight-reading is a skill. Acquiring this skill begins with the very first lesson. Here are a few ideas and strategies that have worked for me as I train my students to be the best sight readers they can be.
- Start note reading at the very first lesson. I prefer to teach the actual notes rather than having students read general positions on the staff and then switching them to the actual notes later on.
-
There are two main methods that I have used for teaching note reading. The first method is to use acronyms and words (mnemonics) to memorize where the notes are on the Grand Staff. The spaces on the Treble Staff spell 'FACE' and the lines are 'Every Good Boy Deserves Fudge (Fun)’ or 'Empty Garbage Before Dad Freaks'. The Bass Staff spaces are 'All Cows Eat Grass' and the lines are 'Good Boys Deserve Fudge (Fun) Always’ or ‘Great Big Dogs Find Animals’. You can also make up your own acronyms. Students generally learn to read quite quickly using this method. However, my experience has been that they can become dependent on these short cuts. It takes much longer to be able to read the notes without saying the sentences, especially in the bass clef. I use this method if the students are not able to learn any other way.

-
My preferred method is sometimes called The Symmetrical 'C' Approach. I find that this method takes longer but achieves better results in the end. The Symmetrical 'C' Approach uses landmark notes throughout the Grand Staff. I call them Hitching Posts. Have students memorize these notes right away. This gives the students something to 'hang on to'. Once they have their Hitching Posts memorized, they can figure out other notes around them.

-
The Grand Staff is like a Mirror. Have them memorize the position of Middle C in the middle of both staves. This is the first Hitching Post. I tell my students that the staff is also like a Ladder....you have to be able to read the notes forwards going up and backwards going down. Have them say the letters ABCDEFG as fast as they can. Then try saying the letters backwards just as quickly...GFEDCBA! Students love trying to see how quickly they can say the letters backwards!
-
After Middle C, I teach the Hitching Posts G and F. In the Treble Staff, G is two lines up from 'Middle C’. The Treble Clef can also be called a 'G Clef' because G is in the middle of the large swirl. And if you stretch your imagination, the treble clef kind of looks like a cursive G. In the Bass Staff, F is 2 lines down from ‘Middle C’. The Bass Clef is also called an 'F Clef'. The big dot of the Bass Clef sits on this F and the two smaller dots are in the spaces on either side of it. If you really stretch your imagination and add two small lines from the small dots back to the bass clef, it kind of looks like an F!
-
When I feel that the students are ready, I teach that the next Hitching Posts are 'Treble C' (3 spaces up from Middle C) and 'Bass C' (3 spaces down from Middle C). Students can memorize these notes, then figure the notes out around them.

-
Later on, you can teach that 'High C' (2 ledger lines above the Treble Staff) and 'Low C' (2 ledger lines below the Bass Staff) are also Hitching Posts. Having these notes memorized helps students read ledger lines.
-
Each Assignment Page in The Student Music Organizer has manuscript across the bottom. For beginner students, every week I write notes on the Grand Staff for them name. I use this to review the all the notes they have learned so far. This becomes part of their theory assignment each week and I will continue to give them notes until they know them fluently. Another great idea is to have them play the notes with their thumb behind their middle finger (RH or LH) while naming the notes out loud. They can do this all week as part of their practice and then add the letter names on the page just before the lesson.
-
Flash Cards can be a very effective tool for students who are just learning to read notes. Have them practice the flash cards at home with a parent or sibling.
- There are Reference Charts for both note reading methods on page 6 of The Student Music Organizer. These Handy Note Readers are also available on small, two-sided or in 8 1/2 x 11 format for teachers to use in the studio.
I have the students start in 3 or 4 beginner books and I use the Dozen a Day books as well. I want them to read lots and lots of music....I call it 'eating music'. The more they read, the quicker they will learn to sight-read. Here are some of the beginner resources that I have used successfully:
-
Music Flash Cards (Jane Smisor Bastien) or Music Flash Cards - Set A (Hal Leonard)
-
A Dozen a Day - Mini Book, A Dozen a Day - Preparatory Book (Edna May Burnam)
-
Easiest Piano Course Part One (John Thompson) I like this book because there are no finger numbers.
- Teaching Little Fingers to Play (John Thompson)
- Teaching Little Fingers to Play Disney Tunes (John Thompson)
- The Leila Fletcher Piano Course - Book One (Leila Fletcher)
-
Progressive Piano Method for Young Beginners - Book 1 (Gary Turner & Andrew Scott). This book has a wonderful accompaniment CD that can be used at the very first lesson. It also teaches the right hand first and then the left hand in C position.
- Leila Fletcher's Music Lessons Have Begun (Leila Fletcher)
-
Piano Adventures - Book 1: Lesson Book. You can also use the Technique & Artistry, Performance, Popular and Gold Star Performance. I find that these books work well after students have completed the initial beginner books.
If you have any favourite beginner books that you use, please feel free to share these in the comments below.
Sight-reading is a skill that takes time to acquire. But it is well worth the effort.
♥︎ Remember.....Great Music Comes from the Heart ♥︎

Photo Credit: denisbin

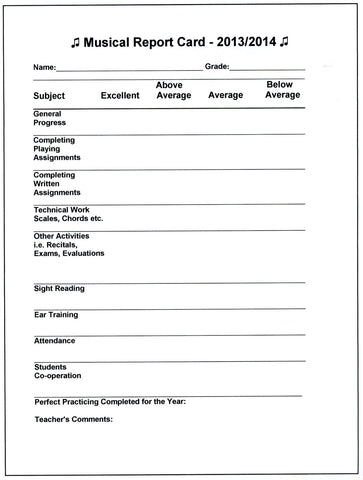
Musical Report Cards
The musical year is almost over.....time to look back and see what has been accomplished. My students really look forward to receiving their Musical Report Cards. This has been a tradition in my studio for many years.
A musical report card is a great way to give students a summary of what they have accomplished over the past year. It's also good for the parents to see the progress that their child has made.
Here are some ideas for using Musical Report Cards in your studio:
- Try to make the report card as positive as possible. Encourage, encourage, encourage!! Every student can usually receive an excellent grade in at least one area i.e. attendance, cooperation etc.
- I find it best to grade as excellent, above average etc. rather than give actual marks or A's, B's etc.
- I have a place on the report card to check if the student is what I call a "Perfect Practicer". (I will talk more about this program in a future blog post).
- I always write a few comments at the bottom of the report card. I usually include one or two areas that the student could improve on next year.
- I list all recitals, exams, master classes, auditions etc that the student has been part of throughout the year. That way, the report card becomes a summary of their musical accomplishments for the entire year. Parents especially appreciate this.
- The report card also gives the teacher an opportunity to summarize and review the entire year with the student at their last lesson. You could review their goals for the past year to see if they have met them. It's also a great time to start planning goals for next year.
I have included the original file for the Musical Report Card. You can use my design or personalize it for your own studio. You can easily add your studio logo or header at the top of the report card.
A Fond Farewell
June is also the time when we say goodbye to some of our students. I would like to recognize the accomplishments of two of my students.
The first student has been with me since 2007. She was a transfer student at the Grade 5 level. She completed her RCM Grade 9 piano with me last year with First Class Honours. This year, she has also completed her Basic, Intermediate and Advanced Harmony and her Basic History with Joe Ringhofer (Phoenix Conservatory). I'm very pleased that she has been accepted into the music program as a piano major at a well-known University in Ontario. I wish her all the best in her future.
Here is a video of her performing a beautiful piece entitled Monarchs from the Isla Vista Suite by Canadian Composer Martha Duncan. A big thanks to Martha for permission to post this performance. This piece is on the Grade 9 RCM list.
The other student that I would like to recognize started with me as a beginner when he was 10 years old. He also completed his Grade 9 piano last year (First Class Honours with Distinction). He is pursuing a career in Music Ministry and has been accepted into the music program at a well-known Bible College in the US.
I have included a video of him performing his amazing recital song—Prelude in c#- by Rachmaninoff.
Both of these students are amazing musicians and I will miss them.
Here is the latter student performing the closing number from my June recital with his brother. It was an entertaining and very funny performance of CS Theme and Variations by Randall Compton. (Published by Heritage Music Press).
♥︎ Remember - Great Music Comes From the Heart ♥︎

Intervals are like Ice Cream, they all have different flavours! I have said this many times to my students over the years.
Ear Training is an essential part of a music exam. And intervals (above and below a given note) are usually an important part of the entire ear training mark. But naming those intervals can be a daunting task for some students. I have found that, even if students have a good ear, they can have difficulty with this portion of the exam. The problem is that when a student is nervous or feeling stressed, they can leave their musical ears in the waiting room!
I would like to share with you some of the teaching strategies that I have used successfully in my own studio.
First: Play the notes of the various intervals together on the keyboard for your students. You can discuss the different flavours of each interval. Have them come up with ideas to describe the sounds as well.
- 2nds: (Steps). The -2nd sounds very close and very harsh (fighting notes). This is a semitone (the smallest distance on the piano). The +2nd sounds very close but not too harsh. It's also helpful to know that it is a whole tone or whole step on the piano.
- 3rds: (Skips) The -3rd sounds sad and not too big. A -3rd contains the first 2 notes of a minor triad. The +3rd sounds happy but not too big. It contains the first 2 notes of a major triad. With either one, if you continue humming to the 5th, you will have a root position triad. It sometimes helps to relate the -3rd below to a doorbell (ding dong!)
- 4th: The Perfect 4th sounds different - it is not part of the root position triad. However, it is a pleasant sound and it is not too big. It also has kind of an open sound, but not as open as the P5th.
- The Tritone (aug 4th or dim 5th) is one of the most tension-filled intervals, but it is not as big as a +7th.
- 5th: The Perfect 5th sounds open, but not too big. It contains the outer notes of a triad.
- 6ths: The -6th sounds kind of sad but it is bigger than a -3rd. The +6th sounds happy but it is also bigger than a 3rd.
- 7ths: The -7th is not so harsh but it is large AND it contains the outer notes of a Dominant 7th chord. The +7th is a very harsh interval AND it is large. I tell my students that this interval should hit you across the face!!! Be careful not to confuse this interval with the tritone.
- 8th: The Perfect 8th is an octave, meaning that the notes sound similar and very big like a rainbow! It also sounds open and can easily be confused with the P5th.
Here are some other simple and effective ideas to help students with naming intervals:
- First and foremost, make sure that they know which intervals they have to know for their grade so they don't guess one they don't even have to know. Have them memorize this list. Review it every time you do intervals in the lesson and have them say it out loud as you play the notes together on the keyboard. One of my students is doing a Grade 5 exam in June. Here is her list: ABOVE +/- 3rds, +/- 6ths, P 4th, 5th and 8th. BELOW: -3 (this is a single....NO +3rd), P5th and P8th (no P4th). When reviewing their list, have them listen carefully as the notes are played together. Have them describe the flavour as you play each one. Review this list every time you do intervals and before you begin testing the student.
- Identify the 'singles' so that they don't guess the wrong one. For example, don't guess a +3rd below if you only have a -3rd!
- If they can, always have the students hum the notes softly immediately as they are being played. Their voice will help then to identify the sound as smaller or larger. They are hearing the interval inside their head and physically feeling the distance with their voice. Work with them so that they can tone match the notes. This doesn't work for every student, but it is helpful if they can do it.
- If a student is a good "hummer", then have them also try to hum the notes in between. But be careful. This is harder than it sounds. Some students can add or take away notes when doing this. Only use this strategy if they can consistently hum the notes in between correctly. I also find that generally, the boys have a harder time humming the notes. They sometimes feel self-conscious, especially if their voice is changing.
- Naming an interval below a given note seems to be more difficult than above. This is especially true for the 3rds. If students can't hear an interval below the given note, have them try humming it softly the other way (forwards). Sometimes that is all they need to identify it. Again, this only works if they are a good hummer.
- It is very helpful to have students associate songs with the intervals. This is especially useful when the student is under pressure or if they can't hum the notes. It's also a good back-up plan even if they can hum! However, the songs become absolutely essential for students who do not have a strong ear and cannot hum.
- I use the Small Interval Cards found on The Student Music Organizer Website. This reference card is so handy. There is a good variety of songs for all of the intervals above and below. They can pick the song that they know the best. Highlight the intervals on the card that they have to know for their exam. The Above intervals are on one side of the card and the Below intervals are on the other side. Turning the card over as they name the intervals is good because they really have to listen to know if the interval is above or below the given note. Having them flip the card is part of the training. If they aren't familiar with any of the songs on the card for a particular interval, then have them learn the first couple of bars of that song. They can also try to come up with a song of their own and write them on the card.
- Make sure that they have the songs memorized for their required intervals. Review these songs every time you work on ear training. You don't want them to know the song and then guess the interval incorrectly!
- I put a pocket in the back of The Student Music Organizer for their Interval Card so that they know where it is!
- There is also a Large Teacher's Version of this card available. It's a great resource to keep by the piano in the studio.
Have fun teaching intervals and remember to savour the different flavours of each one!!
♥︎ Remember - Great Music Comes From the Heart ♥︎

Last spring, I had an interesting experience with one of my students....I'll call him Lee. He came to his lesson one afternoon and he seemed very upset. He said "My teacher at school wants me to play The Cup Song for our class". I didn't think much of it. "Ask your teacher for the music. You can bring it next week and I'll help you learn it", I said and went on with his regular lesson.
The next week, Lee came for his lesson as usual. However, when he walked in the door, I knew something was wrong. "My teacher wants me to play The Cup Song", he said again. This time, he looked visibly upset. "OK" I said, "Did she give you the music?" I asked. He looked horrified!!! "That's the problem" he said, almost in tears. "She doesn't have any music. She told me to just figure it out!". More tears!
ABOUT FACE!! I quickly abandoned what I had planned to do for that lesson.
"OK" I said. "Where can we find this Cup Song?". I had never heard of it before! "It's from a movie." he said. "It's on Youtube. We sing it at school. My teacher said to say Pepsi instead of whiskey!". I had no idea what he was talking about but I was very interested to find out!!
"Well, let's look on YouTube and we'll see what we can do!"
I searched YouTube on the iPad and quickly found the song. I played it over several times and we listened to it together. Thankfully, it was in C+!! (Yes, I thought. I don't have to transpose it!!)
I explained to him that you don't always have to have music to play a piece. What a revelation!! He looked shocked and surprised at the same time! "Wow, that's cool", he exclaimed!
We turned to the manuscript paper at the back of The Student Music Organizer and I started teaching him how to figure out a melody by ear. Then we had an impromptu lesson on how to transcribe it! I showed him how to figure out the time signature. The melody was simple enough but the rhythm was quite tricky. By the end of the lesson, we had written out the melody for the song and he had something to practice for his teacher! It had been a great lesson and Lee went home smiling!
I called his mother in the middle of the week to see how he was doing with the song! "It's all we've heard", said his Mom!! "He plays it over and over and over!".
At his next lesson, I said to him, "We figured out the melody last week and you can play that. Now let's see if we can add some chords". Again, he was intrigued. I proceeded to teach him the basic chords in C+ (I, IV, V and vi). Then I showed him how these chords can be added to the melody. I told him to listen carefully so that he could figure out which chord would work for which notes. We worked through the song and added the chord symbols over the appropriate notes. It was another great lesson and Lee went home, ready to try the next step.
When he returned the following week, he could play the whole song. He was thrilled. Best of all, his school teacher was thrilled!! He ended up playing "The Cup Song" while his whole class sang and did the rhythm with cups. Then the class performed it at the Spring Concert for the entire school! The most important thing was that Lee felt great about what he had done. He had fun playing music with his friends. He was the hero of the class. Mission accomplished!
Here are some fun ideas on teaching basic ear training in a lesson:
- Start with a familiar tune. Have the student figure out this tune by ear. Twinkle Twinkle Little Star works well.
- The student could transcribe the melody on manuscript or just learn it by ear.
- Then teach some basic chords (I, IV, V and VI).
- Have the student figure out which chords go with the melody and where they change.
- After that has been mastered, you could have them try some variations with the accompaniment.
- Try some other 2 and 3-chord melodies i.e. Amazing Grace, Happy Birthday or Silent Night.
- Have fun exploring with your students.

"The Cup Song" is also a great song for teaching rhythm. I found out that quite a few of my students knew this song AND they knew how to do the cup rhythm. I had another bright idea!!! Let's do this song for our final recital in June. The students worked well together and they came up with their own arrangement. The biggest challenge was keeping it in sync. They really had to learn to listen to each other and adjust. The above video was our final rehearsal before the recital .They did it perfectly for the concert AND Lee played it from memory! It was the highlight of the recital!!
The moral of this story: Always be ready to change a lesson plan to meet the needs of your students!
My next post will be: Can You Find the Music Hiding in the Notes?
Special Note:
I have just discovered a cool book which helps to teach rhythms while taking advantage of the cup "craze". It is called "Rhythm Cup Explorations" and it is published by Wendy Stevens. Her Website is called Composecreate.com. It's a reproducible resource, so you only have to buy it once for your studio!


