It's December and preparations for Christmas are in full swing.

Last Friday evening, I held my annual Christmas Piano Recital/Musical Party. My students look forward to this event all year long. They started picking their pieces months ago. I have a rule that once you pick a piece it's yours...no one else can play it. One student has already picked her piece for next year.....The Bell Carol is certainly one of the most popular selections! They don't have to choose a Christmas song, but most of them did. One student decided to play Sonatina in G+ by Clementi. We both felt that this was a great opportunity for him to test his memory for an upcoming Grade 8 exam. (I did think of calling it The Christmas Sonatina…..maybe not!)
The recital was a huge success. All students were in attendance and everyone had a great time. Some used their music, some took the music up and didn’t even look at it and some felt brave enough to play from memory. The most important thing is that they were excited to share their music with each other.
This was certainly the case with my youngest student. She could hardly wait to play Jingle Bells with me. She has only had 11 lessons, but she already plays with confidence and she loved having the bells on her arm.

I'd like to share my six secrets for planning the best Christmas recital ever:
Be organized
I use an Excel sheet called 'Christmas Recital Planning Charts' to organize and prepare for my recital. The file contains several worksheets including the Initial Planning Chart, a Program Planning Chart, the Final Program Planning Chart and a Refreshment Sign-up Chart. I use the Initial Planning Chart to time the pieces before I put the program together.
I find it works well to have the students sitting together at the front of the hall. It helps to have numbers on the students' seats. That way, the students know where to sit and what order they play in. This facilitates the flow of the program.
Shorter is Better
Time the recital pieces! Parents and students will get restless if the program is too long. I find that 60-75 minutes works best…I call this a 'Father Friendly' recital. If you have lots of students, you could hold two separate events (Junior and Senior). My Christmas recital last Friday started at 7:00 and was over by 8:00.
Be Prepared
Make sure the students have 6-8 weeks to work on their pieces. Some students are able to get their songs up quickly...that's great. We can put those pieces on a shelf and work on something else in the meantime. However, most students require more time to feel comfortable performing in front of an audience. It's important that they also prepare mentally for their performance. They are not allowed to say the word nervous….instead I tell them that they are 'excited'…it’s a whole different feeling.
The Three Levels of Memory
This leads to my next point....pieces should be memorized. I don't require them to play from memory at the recital unless they feel at ease doing so. However, they will play so much better if their piece is memorized.
I have a theory about memory and performing. (My students know that I always have a theory about something!)
My theory is that there are three levels of memory.
Level 1: The first level is if you can play it at home, but not for me.
Level 2: You can play it for me but it is still not really ready for a performance.
Level 3: You can play it for anyone. Your piece is memorized in sections and you have many safety nets all the way through. I saw a quote on Facebook that went something like this - "Don’t practice until you can play it right. Practice until you can’t play it wrong!"
One of my students played Dance of the Sugar Plum Fairy by Tchaikovsky. We discussed the fact that it was written for the celesta. That led to the idea of performing it on her keyboard, which has a cool celesta setting.
Variety is the Spice of Life
Make sure that you have lots of variety. I love finding new and different arrangements of familiar songs. I place special numbers throughout the program and I list them in darker print on the program. This helps to keep the program interesting. Some of my students play other instruments as well. Last Friday, we had additional special performances with harp and voice, accordion, several duets and a fun keyboard piece. Here is an excerpt of What Child is This. The singer is a piano student who has never had formal training. She has a naturally beautiful voice that blended so well with the harp.
Make it Fun
Above all, the recital/musical party should be FUN. My students wouldn't miss it.....it is one of the highlights of our musical year. It is so important that this be a positive, enriching experience for them. Each Christmas, I make the traditional Piano Cake which is reserved just for them. After the recital, we had an informal social time with the parents supplying the rest of the refreshments. This also gave me a change to mingle, visit with their families and take pictures.

At their lesson this week I will ask my students what they liked the best about the recital….something other than the food! I know that they will be excited to share their favourite moments. We might even pick their piece for next year.
This Christmas season, my wish for all my students is that they develop a deep love of music in all its beauty and variety, that they learn to play this instrument we call the piano, that they learn to sight read well, that they gain self-confidence as they perform and that they continue to play, enjoy and share this wonderful gift of music throughout their life.

♥︎ Remember - Great Music Comes From the Heart ♥︎

 One of the biggest challenges for a teacher can be finding appropriate pieces that students love to play! I’m always looking for interesting, well written music that captures their imagination but also contains sound pedagogical ideas. Finding such a piece is like finding a hidden treasure.
These past few weeks my students have been busy preparing for their first master class and for the Christmas recital. I teach many different levels, ranging from beginners to advanced. Several students are working towards specific goals such as recitals, exams or evaluations.
We currently live in a rural area and all of my students celebrate Christmas. Because of that, most of them have picked a Christmas song for the recital. However, this was not always the case. When I lived in a large city, I had a more multi-cultural program, reflecting the various ethnic backgrounds of my students.
Master classes and recitals are great because students have an opportunity to share their musical gems with others while building confidence at the same time. It’s important to broaden their musical horizons by having them experience all different styles and types of music, from the Classics to Modern to Pop and Jazz. It's also important that we, as teachers, avoid getting stuck in a ‘musical rut’ by always teaching the same material.
Every year I try to find something new and fresh to share with my students. It makes them feel special because they are playing something unique. They especially enjoy descriptive pieces that paint vivid musical picture.
Regular Pieces
Here are some of the wonderful musical gems that my students have worked on this fall. A few are regular graded pieces, others are Christmas songs, some are pieces that I have taught before and some I am teaching for the first time.
Elementary (Pre-Grade 1 - Grade 2)
- very simple and yet very beautiful
- have students write a story and draw a picture
- great piece to introduce descriptive playing to a younger student
- great piece for teaching the pentatonic scale
- I played the duet with my student while her sisters improvised on a xylophone
- evokes picture of a magnificent eagle soaring high above the majestic mountains
- patterns, counting, pedal, phrasing
- another wonderfully descriptive piece
- broken triads, smooth peddling between hands, dynamic contrasts
- can you imitate the wind as it ebbs and flows? Think of a windy, stormy winter night!
- one of my favourite books, based on poems by Robert Louis Stevenson
Intermediate (Grade 3 - 5)
- very dramatic piece, fun to play
- alternating arpeggios, peddling, dynamic changes, 6/8 time
- the password to obtain the audio track is on the inside cover of the book
- imagine the lazy bedbugs laying around waiting for their next meal!!
- teaches counting and rhythm (swung eighths), listening and staying with the beat
- click here to listen to this piece (from the website)
- all pieces based on provincial flowers of Canada
- Blue Iris is the flower of Quebec
- can you visualize a field of beautiful flowers moving gently in the breeze?
- left hand ostinato, melodic projection, fluid flowing lines
- check out
Red Leaf Pianoworks for more exciting new piano repertoire
Intermediate/Early Advanced (Grades 6 - 8)
- very descriptive piece with modern notation
- always a student favourite
- many changes of dynamics and mood
- dream-like story about a castle, bats and wolves in the dark mist
- great collection of clever and creative arrangements of Irish folk tunes
- fun but challenging piece in 6/8 time
- lots of clef, tempo and key changes, very rhythmic and lively
- Grade 8 exam piece (RCM Syllabus), uses some modern notation
- chord clusters and rapid repeated notes to create a shimmering effect
- lots of dynamic changes and patterns
- very ethereal, beautiful sound picture
Christmas Arrangements
My students love playing creative arrangements of familiar tunes.
These types of arrangements can sometimes be challenging to find, but they are well worth learning.
Elementary (Pre-Grade 1 - Grade 2)
- easy arrangement of a classic song by Tchaikovsky
- relay the history of the piece and explain the use of the celesta
- Alfred’s Basic Adult Piano Course level 2
- beautiful arrangement of this song
- gentle syncopation, chord patterns, melodic projection and balance
Intermediate (Grade 3 - 5)
- this book contains lots of beautifully simple and elegant arrangements
- clever use of Brahms' Lullaby throughout
- balance, phrasing and rubato
- well-written fun, jazzy arrangements of Christmas favourites
- syncopated rhythms and jazz harmonies
- beautiful, inspiring and interesting arrangements
-book 2 is also a favourite
- gentle syncopation, melodic projection, tricky scale passages
Intermediate/Early Advanced (Grades 6 - 8)
- classic carols written in the styles of some of the great composers
- creative, fun way to introduce styles and time periods of different composers
- second volume is called 'More Bach Around the Christmas Tree'
- this book is truly a hidden gem
- wonderful arrangements of familiar and not-so-familiar carols
- fresh approach using Celtic rhythms and colour
- fun romp in 6/8 time
- changes of time and key signatures
Duets - Early & Late Intermediate
- 3 wonderful volumes in this series
- lovely arrangements, great for recital programs
Our first master class of this year was a HUGE success. Everyone loved sharing their special songs and hearing new and interesting pieces. After each performance, I asked them what they liked about the piece. Here are some of their varied and insightful comments....I loved the dreaminess of that piece, I closed my eyes and imagined that I was flying over the mountains, I loved the sounds of the different chords, I could clearly hear 2 voices in the right hand, it sounded very dramatic, the balance was GREAT, I LOVED the story!

Don’t be afraid to try something different. My students love playing imaginative and descriptive pieces. They also enjoy playing creative arrangements of old favourites. Have fun exploring some of these musical gems with your students.
**Feel free to share your Musical Gems in the comments below.**
♥︎ Remember - Great Music Comes From the Heart ♥︎

”Music is written in black and white…..all you have to do is add the colours!” 
There are many different ways to describe colour in music—dynamics, volume, expression, louds and softs, subtle shades of light and dark.
Colour adds interest and beauty to music. Without it, music would be boring. It’s how the composer and the performer convey the message, meaning and emotion of the music to the listener. It's such an important part of a performance.....I call it the icing on the cake. Unfortunately for our students, it also tends to be the first thing that disappears when they are under pressure. Nerves have a way of erasing the colours! So how do you teach your students to remember the colours when they are performing?
Many years ago, I heard an adjudicator at a festival class describe music as a black and white colouring book. She told the students that it is up to them to add the colours for their audience.
At that point, I had a brainwave....I love it when that happens!!! In order for students to remember the colours they need to SEE them! And so I came up with a colour code for music. My theory was that if they saw the same colours over and over again, they would be more likely to play the dynamics correctly. Their brain would eventually begin to associate specific colours with the corresponding dynamic markings. I used highlighters so that the colours would jump off the page!

Here are the colours that I use with my students with the pedagogical reasons behind them:
- PINK for forte (loud) and crescendo (getting louder). It is a very bright colour and it indicates a loud sound.
- YELLOW for piano (soft) and decrescendo (getting softer). It is a much softer, less intense colour for a quiet sound.
- PINK with a YELLOW ring around it for mezzo forte (medium loud) because it is softer than forte.
- YELLOW with a PINK ring for mezzo piano (medium soft) because it is louder than piano.
- PINK with an ORANGE ring around it is for fortissimo (very loud). Orange is a very bright colour and so it reminds them to play louder than forte.
- YELLOW with a BLUE ring around it for pianissimo (very soft) because blue is much softer colour. The BLUE colour tells them to play softer than piano.
- GREEN is used for all the other markings on the page - accents, tenutos, any Italian terms, repeat dots, octave higher or lower, etc. Green can also be used for pedal markings if needed. I often tell my students that a sneaky little tenuto can hide on the page until it is coloured!
- PURPLE is not included in the chart below because I rarely use it. It can be used occasionally for showing stem directions, especially if the piece is written in one clef but played with both hands. It can also be used to colour slurs or staccatos, if students are having trouble remember them. However, I don’t usually colour all slurs or staccatos because it gets too confusing. There is just too much colour on the page. PURPLE can also be used to colour one of the voices of a Fugue.

When introducing a new song to a student, the first thing we do is colour the piece. As the student colours, we talk about everything on the page. That way, I know that they understand all the markings before we begin learning the piece. When the dynamics are coloured, students are also able to spot patterns in the music (sequences, echoes, terraced dynamics etc). This helps when they are memorizing their piece.....they can visualize the colours as they play.
Here is an example of a simple piece that has been coloured. This is a Grade 2 piece called Gavotta in G+ by James Hook. Can you find the dynamic echoes?

Here's a more complicated piece - Sonatina in G+ by Diabelli (Page 1 and Page 2). Having the accents or tenutos coloured green is helpful because they are quite often the destination notes in the phrase. This can then lead to a discussion about melodic shaping.

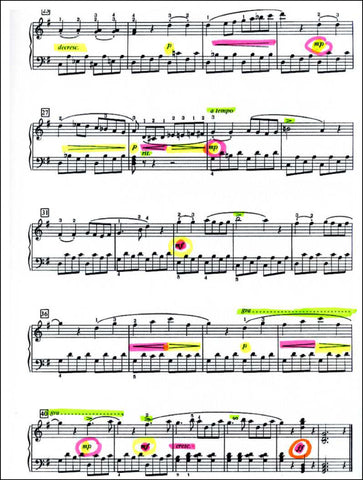
Colouring can be used effectively with senior students as well. Here is an example of how I would colour the Fugue in E+ (J.S. Bach). Notice how each voice has been coloured differently so that the student knows exactly where the lines are. I have also used arrows to show where the voice entries are. (NOTE—Arrows will be discussed in a future blog post).

I have coloured music with my students for many years and I have used this technique with students of all levels. It has been a wonderful tool for helping them to perform their best. Over the years, my students have done many exams, recitals, evaluations, festival classes and auditions. It's important to note that adjudicators and examiners have never had a problem with or even mentioned the fact that my students were using music that was coloured.
Colouring a piece is such a fun activity to do at the lesson. My students have often told me that a piece doesn’t look ‘worked on’ if it’s not coloured! Have fun colouring with your students!!
♥︎ Remember.....Great Music Comes From the Heart ♥︎

Photo credit: Rocky Mountain Sunrise (Canmore, AB) by Peter Eggers

"A goal is a dream with a deadline."
This is a quote from the early 20th century American author Napoleon Hill. He is widely considered to be one of the greatest writers on how to be successful in life. Another of his hallmark expressions was, "Anything the mind of man can conceive and believe, it can achieve."
The beginning of the piano year is an ideal time to talk to our students about musical goals. It’s important that the teacher knows what the student would like to accomplish in the year ahead. The student also needs to know what the teacher believes they can achieve.
Here are some simple goal-setting strategies that you can use with your students:
-
I always take a few minutes at the first lesson to discuss and record each student's goals. This gives me the opportunity to suggest an appropriate amount of practice time per week. Even beginners can have musical goals. For them, it can be something as simple as 'This year I’m going to love music!' On the Forbes website it states, "Creating clear and measurable goals and writing them down is the key to success."
- Communication between parents, students and teacher is very important. Make sure that the parents have the same expectations as the students. Problems can arise when the goals of the parents are too difficult for the student. You may need to speak to the parent alone to express these concerns and come to a compromise.
- Goals for more advanced students might include finishing a level or grade (practical or theory), doing an exam or taking part in a competition. If students don’t want to do exams, then their goals could be to improve their sight reading by completing a certain number of classical or popular pieces. It helps to be specific. For example, a good goal might be to learn a number of scales or pieces by a certain date.
- Musical goals will depend upon the students' abilities and also on how much time they can devote to practice. It’s important that their goals be achievable so they don’t get discouraged.
-
Having said that, sometimes I've had students set a goal that I thought was too difficult. I try to support them and so we discuss the practice time required to reach their goal. For example, last year I had a student who was working at a Grade 3 level. My goal for her was to do a grade 3 exam. However, she expressed a strong desire to complete Grade 4 by the end of the year. We adjusted her practice time and came up with strategies to accomplish this. She worked very hard and did complete her grade 4 with an excellent mark.
- Once we have set some attainable goals for the year, then we discuss how much time they will need to practice each week to attain those goals. Students are juggling many things—school, sports, their social life, family commitments and other activities. The list is endless!! I usually write 3 different daily scenarios on the practice page at the front of the Student Music Organizer....for example: good (30 minutes), better (35 minutes) and best (40 minutes). The length of time will depend on their grade and their goals. Once we have decided on their practice time, I require that they practice that amount 6 days a week...they can have one day off! We then break the time down even further. (i.e. 5 minutes for Sight Reading, 10 minutes for Technique and 15 minutes for pieces).

- Review the student's goals throughout the year. This helps to ensure that they are still on track. You may have to adjust the goals from time to time depending on the progress of the student.
- There is such a great feeling of accomplishment when students are able to reach their musical goals. A Musical Report card is a wonderfully positive way to finish the year. I always list goals that have been completed. I also recognize students at the year-end recital who have completed all of their practicing for the year. I call them my “Perfect Practicers” (see blog post entitled It's June - Musical Report Cards and a Fond Farewell).
-
'The Student Music Organizer' has a special spot on page 2 at the front of the book for listing musical goals. This makes it very easy to review these goals regularly throughout the year. This page also includes a place to keep track of favourite repertoire and a section for exam planning. On page 3, there is a very handy place for planning and organizing the student's practice time.

Teaching is like a triangle. The parent and the teacher are at the bottom supporting the student at the top. Working together as a team is the best way to ensure musical success for the student. Remember - The First Step to Reaching your Goals is Believing You Can Get There.
♥︎ Great Music Comes from the Heart ♥︎

Photo credit: mindfulwishes.com

It's September...time for music lessons to start again. I'm sure that many of us have new students who are just starting piano lessons. It's so important that their first lesson be a very positive and enjoyable experience. I'd like to share with you a fun game that I play at their first piano lesson. My younger students really enjoy this activity and they are learning so much while they are having fun. I call this game "Who Lives in the Doghouse?"
Here's how it works:
-
Using the right hand, have the student tuck their thumb, 4th and 5th fingers together so that you only have fingers 2 and 3 showing (like 2 stork legs)!
-
Have them play all the '2-black keys' on the piano with fingers 2 and 3. Start on the right side of the piano and go to the left.
-
As they play, ask them what they notice about the sound (the notes start high and get lower and lower). Remind them to drop the arm weight forward into the keys as they play so they make a nice sound.
-
When they have finished playing the 2-black keys, have them tuck the thumb and 5th finger behind fingers 2,3 and 4 on the left hand and have them use those fingers to play all the '3-black keys', starting on the left side of the keyboard and going to the right. Again, have them listen to the sounds of the notes and tell you what they notice.
-
The next step is to make 7 ‘doghouses’! They especially love this part! Take 7 various coloured 3x5" file cards and folding them in half. I have the student decorate these with dog stickers. Place a doghouse over each of the '2-black keys’ on the keyboard.

-
At this point, I ask the question…."Who lives in the doghouse?” And they answer - "The dog, of course!!"
-
I then tell them that the white key between the 2-black keys is called a D.....D for Dog!
-
In the right hand, have them place their thumb behind the first joint of the 3rd finger and play all the 'Dogs' on the piano. Start with the low, grouchy dogs and play up to the high dogs!
-
The thumb behind the 3rd finger helps to support the joint so that it doesn’t collapse. It also gives a nice, rounded hand position and helps them to feel the arm weight drop into the keys. Take care that they don’t raise the 5th finger as they play.
-
Next I ask ”OK….what note comes BEFORE D in the alphabet?" They usually have to think about this one for a bit!!
-
Finally they say C. I tell them that the note to the left of D is the Cat (C)! He lives under the dog house because the dog won't let him inside!! Have them play all the Cat's on the keyboard.
-
"Now...what note comes AFTER D”? “That’s easy….E!” “E is for Elephant. He won't fit inside the doghouse, so he lives on top of it!!” Have them play all the E's on the piano.
-
You can alternate between starting high or starting low on the piano.
-
I call the "3-Black keys" the big house! “What note comes before C?” “B is for Boy. The boy lives on the roof of the big house because he feeds the cat!”
-
The rest of the game goes like this.....Father (F) went to Africa and came back with an elephant! He lives in the basement of the big house so he can feed the elephant!
-
The Grandma (G) lives downstairs in the big house because she doesn’t like the stairs. However, the Aunt (A) lives upstairs.
-
I usually embellish the story as we go along! They like to add to the story as well. Students also love to ‘practice’ their doghouses at home!
My beginner student came for her second lesson this morning. Her mother said that she absolutely LOVED the doghouses! She had placed cat stickers on the back side of the cards. When I asked her why, she said "Because the cat lives beside the doghouse!"
I play this game with my students for several lessons until they have a solid knowledge of the keys on the piano. My older students tell me they still remember their first piano lesson when we played this game! It’s a great way to make the first lesson special. Have fun making doghouses!
♥︎ Remember - Great Music Comes From the Heart ♥︎


A lighthouse stands as a symbol of security and safety. It helps sailors to navigate through rough waters and avoid the rocks along the shore. Having solid and effective studio policies in place will help you, as a teacher, avoid many unnecessary problems and conflicts. It’s important that everyone knows where you stand. You will find that your parents and students will have more respect for you as a teacher if you have a set of clear, concise rules and procedures in place. And, more importantly, they need to know that you will stick by those rules. That can sometimes be very difficult. Some of the policies that I have in place are because I had a difficult situation with a parent or student and I needed to address it. And, of course, there are always exceptions. These situations can be dealt with individually, at your discretion. But it is so important to have studio policies written down.
Here are some simple ideas that you can use to formulate your own studio policies.
-
For teachers who are running their own business, collecting money can be one of the biggest problems. The first thing that I explain in my policies is how I expect the fees for lessons to be paid. There are many different ways to do this. After trying various approaches, I have come up with a system that works perfectly for me.
-
I refer to the lesson fees for the year as tuition. After all, I am running a music school. I teach 35 weeks a year. I have divided those weeks into 5 terms with seven lessons for each term.
-
In May, I e-mail the registration form to the parents along with a copy of my studio policies. I ask that this form be returned by the end of the June along with 5 post-dated checks for next year’s tuition.
-
The date for the first check is always 2 weeks before I start teaching. That way, I know that all the funds will have cleared the bank before the first lessons in September.
-
I spread the dates for collecting the other 4 checks throughout the teaching year. One is cashed in early October, one in late November, one in late January and one mid-March. That way, all tuition is paid by mid-March.
-
It's not a good idea to have the 3rd check dated for mid-January. There are too many post-Christmas bills. It works much better to have it dated for the end of January or the beginning of February.
-
I always send a reminder to parents by e-mail the week before the check is cashed. I also write a reminder in the student’s Organizer. It’s easy for a parent to forget about a post-dated check.
-
I let parents know in the studio policies that all activities throughout the year are covered in the tuition. That includes Master Classes and Recitals. I include theory instruction in their lessons and I don’t charge extra to mark practice papers for theory exams. Parents appreciate knowing what they don’t have to pay for!
-
Once a check is cashed, I don’t give a refund. I also ask for one-months notice if they are stopping lessons. This will not always happen, but at least I have it written down.
-
I ask that attendance be regular and punctual. I let them know that if they arrive late, I will not make up the time.
-
For illness, I ask for 24 hours notice if they have to cancel a lesson. I do charge for a lesson if it is cancelled at the last minute. I do not make up lessons if students are away on holidays.
-
If parents know ahead of time that their child is going to miss a lesson for other reasons (sports games, school events, birthday parties etc), I will give them suggestions as to who they could switch with. It is their responsibility to arrange that switch and then let me know who they have switched with. Parents really appreciate this flexibility.
- I have included a copy of My Studio Policies with this post. These policies are a result of years of experience and they have worked very well for me in my teaching. However, it’s important to stress that what works for me may not work for others. Every teacher and every area is different. If you wish, use this as a starting point to come up with policies and procedures that work for you.
As private music teachers, we have the best job ever. I love what I do! I love working with my students and inspiring THEM to love music. It’s great to see the excitement in their eyes as they grow and progress. It’s music to MY ears when one of my students says to me “I LOVE that piece!” I consider it a privilege to nurture their love of music.
But it’s also important to remember that you are running a business. And in order for you to run your business effectively and professionally, it is imperative that you have written studio policies. May you have smooth waters as you sail into September this year.
♥︎ Remember, Great Music Comes from the Heart ♥︎


How do you motivate students to practice?
This is one of the biggest challenges for a piano teacher. We want our students to love music but they have to practice if they are going to progress. And practicing is work! How can we motivate our students to practice more effectively?
My goal for my students is for them to have what I call "no nag" practice.
I want them to enjoy their practice AND I want them to progress. Here are some of the strategies that I have used in my own teaching to help my students meet their musical potential and have fun doing it!
#1: Set Goals
I always take a few minutes in their first lesson and talk to them about what they want to accomplish in the upcoming year. It's also a good idea to speak with a parent so that you know what they are expecting from their child's music lessons. I write these goals on a special page at the front of the Student Music Organizer. For a first-year student, their goal might be something as simple as becoming a better note reader, to learn lots of new pieces and, of course, to love music! For an older student, maybe they want to do an exam or finish a grade. Some students may have upcoming auditions or competitions. Each student is unique. Setting goals helps to ensure that the teacher, parent and student are all on the same musical page!
#2: Set Daily Practice Time
Once we have set some attainable goals for the year, then we discuss how much time they will need to practice each week to attain those goals. Students are juggling many things—school, sports, their social life, family commitments and other activities. The list is endless!! I usually write 3 different daily scenarios on the practice page at the front of the Student Music Organizer....good (30 minutes), better (35 minutes) and best (40 minutes). The length of time will depend on their grade and their goals. Once we have decided on their practice time, I require that they practice that amount 6 days a week...they can have one day off! We then break the time down even further. (i.e. 5 minutes for Sight Reading, 10 minutes for Technique and 15 minutes for pieces).
#3: Have Students Record Their Practice Time Each Day
There is a great chart on each assignment page of the Student Music Organizer where they can keep track of their practice times. If they do extra time, I write this below the chart. We call this a "Musical Bank". Then, if they have a crazy week and can't complete all of their time, they can 'borrow' some time from their bank! Students love this idea. I've had students competing to see who can get the biggest bank....it's a very sneaky way to motivate them to do more practicing!! For younger students, I usually have the parent fill in the practice time or have them initial it.

#4: Stickers
I have found that all students love stickers, not just the younger ones! I always have a special "Sticker of the Week". If they have completed their practice time for the week, then, at their lesson, I will put this sticker on their Assignment page. If they have a 'musical bank', they know that they can borrow from that bank and still receive their sticker.
#5: Studio Practice Chart
In September, I make a large chart on a piece of Bristol board and place it on the wall in the studio. If the student has completed all of their practice time, then they can put a special sticker on the chart for that week. Just knowing that they will be able to put their sticker on the wall really helps motivate them to complete all of their practice time! I also encourage them to try to spread their practicing out over the week. Consistent daily practice is much more effective than a marathon just before the lesson!

#6: Treat Week
If students have completed all of their practicing for the last 5 weeks, then they receive a treat. You wouldn't believe how motivating a Rice Krispie Square can be! My teaching year consists of 35 weeks, so that means that there are seven treat weeks in the year. I use a different sticker on the studio practice chart after each treat week. At the recital, I honour those students who have completed all of their practicing for the entire year with a special certificate. I call them my 'Perfect Practicers'. Most of my students will receive this honour.
Both of my recipes for these delicious and simple Rice Krispie Squares are shared with this post - 2 separate files. (Chocolate-Peanut Butter Rice Krispie Squares and Regular Rice Krispie Squares).
Have fun helping your students to achieve their goals. Please feel free to share any motivational ideas that you have used in your studio.
♫ A SPECIAL NOTE ♫…The Student Music Organizer Website is having a fantastic 15/15 sale! For the entire month of August, teachers will receive 15% off of their entire order if they order 15 organizers or more. Use the discount code AUGUST at checkout to take advantage of this terrific deal.
♥︎ Remember, Great Music Comes from the Heart ♥︎


Summer is a great time to relax and enjoy the nice weather. But for music teachers, summer is also the time to prepare for the fall. There is always so much to do before regular lessons resume. Organization is the key to having a well-run business. With a little planning ahead of time, you can sail into September knowing that everything is ready to go! That way you will spend less time worrying about all the things that you have to do and more time enjoying the time off. I would like to share with you a few great organizational ideas that have worked for me.
-
One of the first things that I do when preparing for the upcoming season is to work on my Yearly Studio Calendar. I have an Excel chart that I use to generate a one-page Calendar for parents and students. I can use the same chart each year. I just change the dates and add all the important information that I feel my students and parents need to know for the whole year (i.e. master classes, recitals, festivals, holidays, deadlines, exams, upcoming events, vacations, etc). In late August, I e-mail this to all of my parents along with a reminder of their first lesson date and time. I place a copy of the Calendar on the bulletin board in my waiting room. I also tape a copy in the back of each student’s Organizer so that I can refer to it at their lesson throughout the year and highlight any upcoming dates. I've included a link to my original file for the Yearly Studio Calendar in this post. That way, you can download it and change the information to suit your own teaching year.

- The iPad is an amazing tool. For me, it was definitely worth the investment. (See previous Blog Post called 'The iPad and the Music Teacher'). The Calendar App is one of the best studio organization tools on the iPad. I love how it backs up automatically to the cloud so that I don’t have to worry about losing my information. Entries can be colour coded to keep track of lessons that have been changed or missed. You can also write notes pertaining to a lesson directly on the individual entires. The search function is fantastic. In an instant, I can see all of the lessons for one particular student for the entire year. I also find the Contacts App very useful for keeping track of all student information. My iPad has revolutionized the way that I organize my business. Here's a link to help you get started. This article will help you with the basics of using the calendar App.
- I have a very handy ‘Performance Tracking Chart’ (Excel File) that I use to organize all student performances throughout the year. Once I’ve completed my yearly calendar, I set up this chart with student's names and dates of all master classes, recitals and other performances. Then I print it and put it on a clip board that I keep beside me in the studio. I can use this chart for performance planning throughout the year. In September, the first thing we do is pick a Master Class piece (for the end of October) and a Christmas recital piece. I will also use this to help plan performances for exam preparation. I can keep track of all performance pieces for all students throughout the year on these sheets. I find it easier to work with a paper copy in the studio. I can fill it in as I’m teaching. Every two weeks or so, I will update the chart on the computer with any changes or additions and print it again. This gives me a running list of all performance pieces being worked on by my students at all times. I also list the students' pieces in their own Organizer. There is a column in the chart for keeping track of the total playing time for pieces which is useful for timing recitals and Master Classes. Here is the original file of my ‘Performance Tracking Chart’. This will allow you to input the names, dates and events to suit your own studio.

-
The Student Music Organizer is another great time-saving teaching tool. Each September, my students start a brand new book. The book is written on 8 1/2 x 11” paper so there is lots of room for writing notes. It is is designed to last for an entire year of lessons so you don't have to buy 2 or 3 smaller notebooks. At the end of the year, you will have a complete record of what has been done for the entire year. Parents love it as well. If they have a question, I can tell them to check the Organizer! Here are some of the sections included in this great resource:
-
Goal Setting Section — I do this on the first lesson so that we know how to plan for the year.
-
Favourite Piece Section — This is very helpful when planning recitals, festivals or exams.
-
Exam Planning — for students doing an exam in the upcoming year, we start planning right away.
-
Practice Planning — after we have set goals for the year, we then decide together how much time they will need to practice each week to attain these goals. This time can then be broken down into smaller sections so they know how long to spend on each aspect i.e. pieces, technique, sight reading
-
The Organizer contains 35 Assignment Pages. These sheets can be filled out during the lesson. Each page contains a chart for recording weekly practice. There is also manuscript across the bottom and the pages are numbered so you can refer back to a scale or exercise assigned earlier in the year.
-
The back of the book contains lots and lots of valuable reference material. You will find extra manuscript paper, a composer chart, summary sheets for musical time periods (Baroque, Classical, Romantic, Impressionism and Modern), music dictionaries, basic music theory reference guides and a wonderful comparative fingering chart for keyboard instruments.

- ♫ A SPECIAL NOTE ♫…The Student Music Organizer Website is having a fantastic 15/15 sale! For the entire month of August, teachers will receive 15% off of their entire order if they order 15 organizers or more. Use the discount code AUGUST at checkout to take advantage of this terrific deal.
Have a great rest-of-the summer AND have fun getting organized for September.
♥︎ Remember, Great Music Comes from the Heart ♥︎

♥︎ Remember - Great Music Comes From the Heart ♥︎

Photo credit: "Over the River and Through the Woods" by garlandcannon

All Cows Eat Grass.....this is one of the many popular sentences used to teach note reading on the grand staff. But is this the most effective way for students to become the best sight readers?
Sight-reading is a key. It can open the door to the amazing world of music. To be a good sight reader, a student must first learn how to read the notes. It is important to remember that music is a language. When a child is first learning to read a language, they have to start by learning the alphabet. Then they learn how to read words, sentences and eventually books, using those letters. It is the same for music and it takes a good deal of time and effort.
Sight-reading is a gift. I often tell my students that sight reading is probably one of the greatest gifts that I can give to them. My hope for my students is that they will continue to play the piano long after they have finished taking lessons. Many times I have heard adults regretfully admit that they took lessons when they were young but can no longer play.
Sight-reading is a skill. Acquiring this skill begins with the very first lesson. Here are a few ideas and strategies that have worked for me as I train my students to be the best sight readers they can be.
- Start note reading at the very first lesson. I prefer to teach the actual notes rather than having students read general positions on the staff and then switching them to the actual notes later on.
-
There are two main methods that I have used for teaching note reading. The first method is to use acronyms and words (mnemonics) to memorize where the notes are on the Grand Staff. The spaces on the Treble Staff spell 'FACE' and the lines are 'Every Good Boy Deserves Fudge (Fun)’ or 'Empty Garbage Before Dad Freaks'. The Bass Staff spaces are 'All Cows Eat Grass' and the lines are 'Good Boys Deserve Fudge (Fun) Always’ or ‘Great Big Dogs Find Animals’. You can also make up your own acronyms. Students generally learn to read quite quickly using this method. However, my experience has been that they can become dependent on these short cuts. It takes much longer to be able to read the notes without saying the sentences, especially in the bass clef. I use this method if the students are not able to learn any other way.

-
My preferred method is sometimes called The Symmetrical 'C' Approach. I find that this method takes longer but achieves better results in the end. The Symmetrical 'C' Approach uses landmark notes throughout the Grand Staff. I call them Hitching Posts. Have students memorize these notes right away. This gives the students something to 'hang on to'. Once they have their Hitching Posts memorized, they can figure out other notes around them.

-
The Grand Staff is like a Mirror. Have them memorize the position of Middle C in the middle of both staves. This is the first Hitching Post. I tell my students that the staff is also like a Ladder....you have to be able to read the notes forwards going up and backwards going down. Have them say the letters ABCDEFG as fast as they can. Then try saying the letters backwards just as quickly...GFEDCBA! Students love trying to see how quickly they can say the letters backwards!
-
After Middle C, I teach the Hitching Posts G and F. In the Treble Staff, G is two lines up from 'Middle C’. The Treble Clef can also be called a 'G Clef' because G is in the middle of the large swirl. And if you stretch your imagination, the treble clef kind of looks like a cursive G. In the Bass Staff, F is 2 lines down from ‘Middle C’. The Bass Clef is also called an 'F Clef'. The big dot of the Bass Clef sits on this F and the two smaller dots are in the spaces on either side of it. If you really stretch your imagination and add two small lines from the small dots back to the bass clef, it kind of looks like an F!
-
When I feel that the students are ready, I teach that the next Hitching Posts are 'Treble C' (3 spaces up from Middle C) and 'Bass C' (3 spaces down from Middle C). Students can memorize these notes, then figure the notes out around them.

-
Later on, you can teach that 'High C' (2 ledger lines above the Treble Staff) and 'Low C' (2 ledger lines below the Bass Staff) are also Hitching Posts. Having these notes memorized helps students read ledger lines.
-
Each Assignment Page in The Student Music Organizer has manuscript across the bottom. For beginner students, every week I write notes on the Grand Staff for them name. I use this to review the all the notes they have learned so far. This becomes part of their theory assignment each week and I will continue to give them notes until they know them fluently. Another great idea is to have them play the notes with their thumb behind their middle finger (RH or LH) while naming the notes out loud. They can do this all week as part of their practice and then add the letter names on the page just before the lesson.
-
Flash Cards can be a very effective tool for students who are just learning to read notes. Have them practice the flash cards at home with a parent or sibling.
- There are Reference Charts for both note reading methods on page 6 of The Student Music Organizer. These Handy Note Readers are also available on small, two-sided or in 8 1/2 x 11 format for teachers to use in the studio.
I have the students start in 3 or 4 beginner books and I use the Dozen a Day books as well. I want them to read lots and lots of music....I call it 'eating music'. The more they read, the quicker they will learn to sight-read. Here are some of the beginner resources that I have used successfully:
-
Music Flash Cards (Jane Smisor Bastien) or Music Flash Cards - Set A (Hal Leonard)
-
A Dozen a Day - Mini Book, A Dozen a Day - Preparatory Book (Edna May Burnam)
-
Easiest Piano Course Part One (John Thompson) I like this book because there are no finger numbers.
- Teaching Little Fingers to Play (John Thompson)
- Teaching Little Fingers to Play Disney Tunes (John Thompson)
- The Leila Fletcher Piano Course - Book One (Leila Fletcher)
-
Progressive Piano Method for Young Beginners - Book 1 (Gary Turner & Andrew Scott). This book has a wonderful accompaniment CD that can be used at the very first lesson. It also teaches the right hand first and then the left hand in C position.
- Leila Fletcher's Music Lessons Have Begun (Leila Fletcher)
-
Piano Adventures - Book 1: Lesson Book. You can also use the Technique & Artistry, Performance, Popular and Gold Star Performance. I find that these books work well after students have completed the initial beginner books.
If you have any favourite beginner books that you use, please feel free to share these in the comments below.
Sight-reading is a skill that takes time to acquire. But it is well worth the effort.
♥︎ Remember.....Great Music Comes from the Heart ♥︎

Photo Credit: denisbin

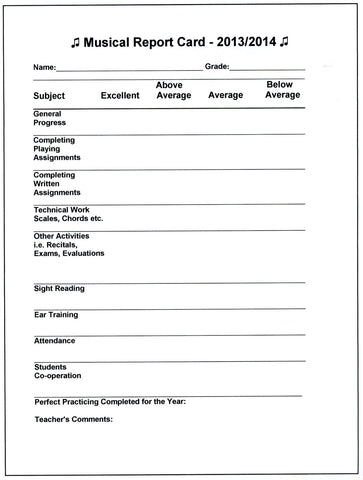
Musical Report Cards
The musical year is almost over.....time to look back and see what has been accomplished. My students really look forward to receiving their Musical Report Cards. This has been a tradition in my studio for many years.
A musical report card is a great way to give students a summary of what they have accomplished over the past year. It's also good for the parents to see the progress that their child has made.
Here are some ideas for using Musical Report Cards in your studio:
- Try to make the report card as positive as possible. Encourage, encourage, encourage!! Every student can usually receive an excellent grade in at least one area i.e. attendance, cooperation etc.
- I find it best to grade as excellent, above average etc. rather than give actual marks or A's, B's etc.
- I have a place on the report card to check if the student is what I call a "Perfect Practicer". (I will talk more about this program in a future blog post).
- I always write a few comments at the bottom of the report card. I usually include one or two areas that the student could improve on next year.
- I list all recitals, exams, master classes, auditions etc that the student has been part of throughout the year. That way, the report card becomes a summary of their musical accomplishments for the entire year. Parents especially appreciate this.
- The report card also gives the teacher an opportunity to summarize and review the entire year with the student at their last lesson. You could review their goals for the past year to see if they have met them. It's also a great time to start planning goals for next year.
I have included the original file for the Musical Report Card. You can use my design or personalize it for your own studio. You can easily add your studio logo or header at the top of the report card.
A Fond Farewell
June is also the time when we say goodbye to some of our students. I would like to recognize the accomplishments of two of my students.
The first student has been with me since 2007. She was a transfer student at the Grade 5 level. She completed her RCM Grade 9 piano with me last year with First Class Honours. This year, she has also completed her Basic, Intermediate and Advanced Harmony and her Basic History with Joe Ringhofer (Phoenix Conservatory). I'm very pleased that she has been accepted into the music program as a piano major at a well-known University in Ontario. I wish her all the best in her future.
Here is a video of her performing a beautiful piece entitled Monarchs from the Isla Vista Suite by Canadian Composer Martha Duncan. A big thanks to Martha for permission to post this performance. This piece is on the Grade 9 RCM list.
The other student that I would like to recognize started with me as a beginner when he was 10 years old. He also completed his Grade 9 piano last year (First Class Honours with Distinction). He is pursuing a career in Music Ministry and has been accepted into the music program at a well-known Bible College in the US.
I have included a video of him performing his amazing recital song—Prelude in c#- by Rachmaninoff.
Both of these students are amazing musicians and I will miss them.
Here is the latter student performing the closing number from my June recital with his brother. It was an entertaining and very funny performance of CS Theme and Variations by Randall Compton. (Published by Heritage Music Press).
♥︎ Remember - Great Music Comes From the Heart ♥︎