3 Super Effective (and Fun) Ideas for Teaching a New Piece Darlene Irwin
 Starting a new piece with a student can sometimes be a daunting challenge. It should be something that appeals to your student and helps them progress musically towards their goals. It should also contain sound pedagogical ideas. Some questions that you need to ask yourself are….what time period do you want your student to explore? Do they need a certain type of piece for an upcoming exam? Does the piece help them to reach their goals? Can your student handle the technical challenges within the piece? And most importantly…..do they like it!!
OK….so you and your student have picked the perfect piece. Now what? How do you make this piece fun, attainable, and approachable? In this blog post, I’d like to share with you some of the ideas that have worked for my students.
Introducing….Colours, Sections, and Arrows!

Colouring the Music
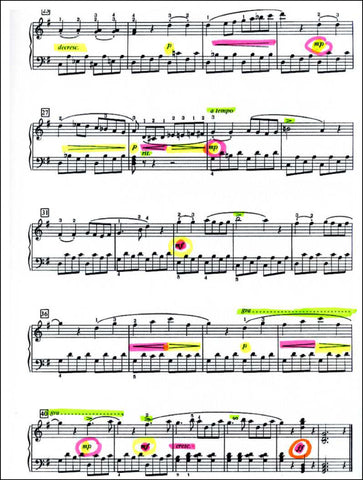
- After we have chosen a new piece, the first thing we do is colour all the markings on the score. (I know…some teachers may not be comfortable colouring the score. I find that my students really enjoy doing this. They tell me that the piece doesn’t look ‘worked on’ if it’s not coloured!)
- I have a code that we use…Forte is pink, piano is yellow etc. We colour all the other markings green…tenutos, accents, Italian terms & signs. My theory is that when they see certain colours, they will associate that colour with the dynamics marked in the music. We talk about each marking as we colour it. Accents, including tenutos, tend to hide on the page. They are much easier to see when they are coloured green (see previous blog post for details). We also discuss key signature, time signature, articulation, phrasing and any terms or signs.
- Colouring has worked for students of all ages. A fugue is MUCH easier to learn when the voices are shown in different colours. (This could be done on a copy rather than on the original score).
- Over the years, my students have done many exams, recitals, evaluations, festival classes and auditions. It's important to note that adjudicators and examiners have never had a problem with or even mentioned the fact that my students were using music that was coloured.

Sections
- Break the piece down into logical, manageable sections, according to phrasing, structure and motifs. I do this by drawing a pencil line at the end of each section. The sections are then labeled A, B, C etc. If a long song has more than 26 sections, we have actually resorted to using double letters! (AA,BB etc.)
- Make sure that repeated sections are divided the same way i.e. in the recapitulation of a Sonata or Sonatina.
- As you are marking the sections, you can discuss a little of the history, style and form of the piece. You can also make note of any key modulations and mark the main cadence points.
- When teaching a new song, I like to have them start by playing the left hand first. We compare the sections and look for patterns. Check and see if the patterns are repeating. Do they change key? Do the intervals change? Are there any sequence or imitation sections? Are there any variations in the patterns?
- Have your student start by learning 1 or 2 sections, hands separately and then hands together. You can add more sections as they progress week by week. That way, if there are mistakes, they can be fixed quickly. This saves time because they learn it properly the first time.
- Having a piece divided into sections is also essential for memorization. It provides safely nets all the way through the piece - places where your student can jump if they have a lapse in memory.
- Boxes are small parts within a larger section. They can be labeled Box#1, Box#2 etc. These are very tricky passages within a larger section that need special attention.
- Have your students practice the boxes hands separately, then hands together at a slow tempo, until it is fluent and played correctly. A box can also be subdivided into mini-boxes!

Arrows
- Arrows are great for correcting learned mistakes. I use the coloured Post-it Flags (Mini Arrows). They can be placed on the music to point to specific problems, you can write on them and they can be removed once the mistake is corrected. They are also reusable!
- As I’m listening to a piece in a lesson, I can quickly mark mistakes with these arrows. I can then go back at the end of the performance and explain why the arrows are there.
- The next time I hear the piece, I can removed arrows from issues that are fixed or move them if there are other problems. The really cool part is that I can place the arrows as the student plays the piece. It's quick and easy. This helps me to remember what I have heard and what I want them to fix. It also saves me from having to write a lot of notes!
- You could take the arrows a step farther and colour code them for certain problems i.e. blue for wrong notes, yellow for missing dynamics, red for phrasing issues, pink for missed rests etc.
- Sometimes my student's pieces are COVERED with arrows! When the problems are fixed, the arrows are removed. My students love trying to get rid of all the arrows on their music!
- We do remove all arrows just before a performance such as an exam or audition.
Here are a couple of examples of how I would use these techniques. These pieces are coloured and divided into sections. The problem areas have been boxed. I have used red arrows to show phrasing concerns, yellow arrows for problems with dynamics and green arrows for other problems.
Gavotte in D Major

Sonatina in G Major


As a teacher, I always strive to make the music learning process as fun as possible. My student love to colour their music. The sections and boxes make it so much easier to learn and memorize a piece AND they have safety spots throughout their song. The arrows let them know exactly what needs to be fixed. Have fun exploring these ideas with your students.
♥︎ Remember - Great Music Comes From the Heart ♥︎
![]()